By Mikey Walters / July 10, 2017
 This is the seventh in a series of articles about programming in Atari BASIC. The previous installments are here. Space Assault source code and references can be found here. BAS files for use with Atari emulators of the original program and enhanced program can be found here.
280 PRINT “Press Start”
In Lesson Six, we saw how Space Assault’s enemy ships move and attack with a semblance of intelligence, learned how to create an Atari “earthquake,” and generally completed our coverage of the core of the game’s code. Now it’s time to explore the incredible sound capabilities of the Atari home computer, including music and exciting effects. When Space Assault is run, the first thing the player sees is the game’s title, accompanied by some “theme music,” so let’s start by coding the title screen.
The title screen has been an essential element of video game design since the beginning, appearing in nearly every arcade game, home cartridge game, and even amateur software. As a 16-year old programmer, it was unthinkable to create a game without some display of the game’s title, author credit, and the ubiquitous “Press Start” message. Space Assault’s title screen is produced by quite a bit of code, but it was important to set the mood. The title screen concept eventually evolved into attract mode, where game play was demonstrated to entice the player to drop a quarter or press a button, and even today most software includes a splash screen or page to serve a similar purpose.
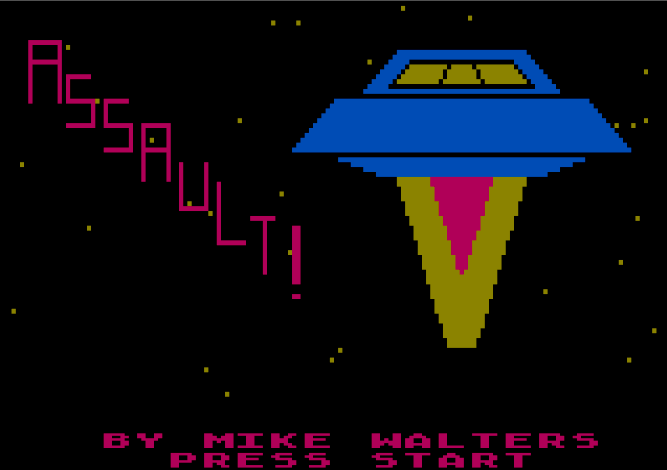 You may notice that our title screen is mostly composed of a graphic image, but also includes two lines of large text at the bottom. This is accomplished through yet another powerful feature of Atari’s ANTIC chip that allows multiple graphics modes to be combined in a single screen. This is done by manipulating the display list, which was also the secret of the earthquake effect covered in Lesson Six. Creating a custom display list is a fascinating but complex topic, which will be covered in full in our next lesson. For now, we’ll draw the title screen image using the same PLOT and DRAWTO techniques we examined way back in Lesson Two. In fact, the first task is to fill the screen with some random stars (line 2360), which we covered in Lesson One.
 The next job is to draw the large letters reading “ASSAULT!”. (As an aside, Assault! was my original title for the game, but ANALOG Computing changed the name to Space Assault for publication.) To reduce the number of PLOT and DRAWTO statements needed for this tedious task, we use a nested loop “controlled” by DATA statements.
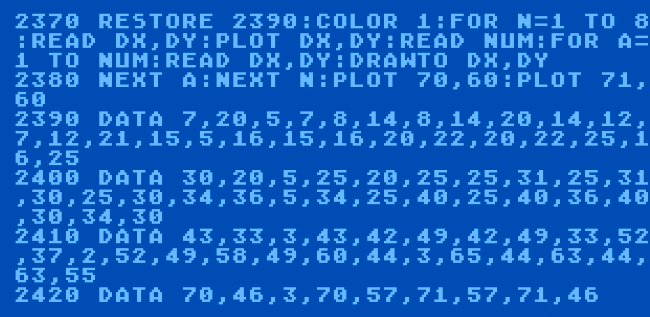 Since there are eight characters in “ASSAULT!” (including the exclamation mark), the outer FOR loop executes eight times. Each time through the loop, we first READ our starting coordinate into DX and DY and PLOT the pixel. The next number we READ contains the number of segments in each letter, so our inner loop will execute NUM times. Now we continue reading DX and DY coordinates and DRAWTO each segment until the letter is complete (lines 2370-2380). The final PLOTs at the end simply dot the bottom of the exclamation point. Of course, it took some graph paper and effort to come up with the values for these DATA statements, but the end result does a lot of drawing with minimal code.
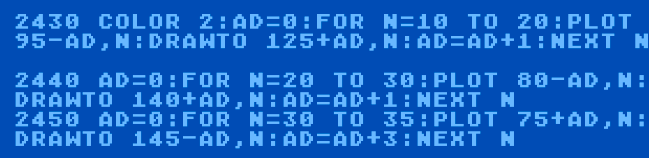 The large saucer image begins with three blue polygons. Each of these is created by simple loops plus an additional offset variable called AD (for “add”). The loop variable N is used for the vertical coordinate, and AD is used for an offset between two horizontal coordinates. The code inside each loop creates a horizontal line with PLOT and DRAWTO, then increases the offset to make the polygon wider or narrower as the loop progresses (lines 2430-2450).
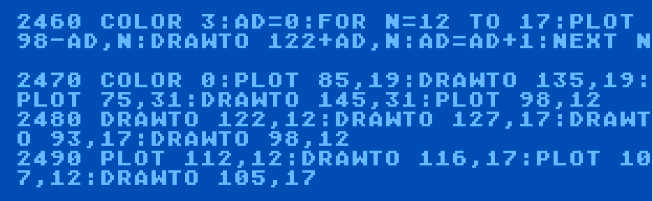 The same technique is used again to create a yellow “windshield” on top of the first section (line 2460), and then the shape is carefully outlined using our black background color to provide a little detail (lines 2470-2490).
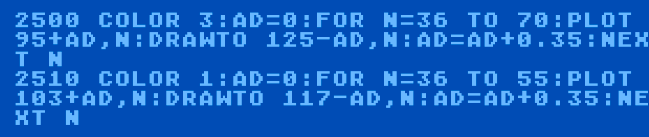 Finally, the polygon technique is used two more times to create the saucer’s rocket flame, first with yellow (line 2500), and then with our reddish color (line 2510). Aside from the windshield detail lines, the entire saucer was created with this useful loop/offset method. Although it was possible to perform a graphics fill with Atari BASIC’s obscure XIO statement, I wasn’t aware of it when Space Assault was written. Of course, today this image would be generated using a dedicated graphics application and simply loaded and displayed, but using Atari BASIC to manage every pixel still has a certain tedious charm.
290 PRINT “Cue Dramatic Music”
Space Assault’s title screen is now complete, so let’s learn about programming sound in Atari BASIC (which we’ve glossed over in previous lessons) and create some theme music. The Atari home computer’s sound capabilities were quite amazing for the era, only rivaled by the Commodore 64, thanks to the innovative POKEY chip. This custom chip was responsible for reading joystick and keyboard signals, but was also capable of producing sophisticated four-voice sound, used for music and effects in countless entertainment and educational programs. But the real strength of the POKEY chip was its ease of use, since any amateur programmer could generate sound via Atari BASIC’s convenient SOUND statement.
The SOUND statement includes four parameters. The first designates which voice to use (0-3), allowing sounds to overlap or produce harmony. The second parameter specifies a pitch (0-255), with small numbers for high tones and large numbers for lower tones. The third parameter is called “distortion” (2-14, even values), which requires some experimentation to understand, but generally specifies if a tone should be pure (as a musical note) or “impure”, used for engine sounds, explosions, and so on. Finally, the fourth parameter is used for volume (0-15), which allows different loudness levels for each voice. These four parameters are capable of generating every sound experienced in a home video game, making the SOUND statement incredibly powerful, especially when combined with loops and other programming techniques.
To generate the theme music for Space Assault, we’ll use a distortion of 10, which is a pure tone. Our pitch should equate to the musical notes we want to create, and thankfully many Atari BASIC programming books and articles included a chart of pitch values for each note, similar to this one.
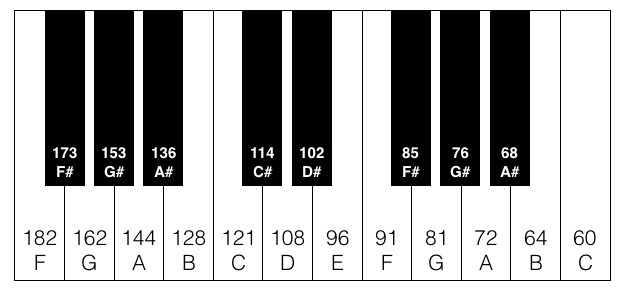 For example, SOUND 0,121,10,8 will play a pure middle-C note at a reasonable volume using the first voice. Each voice will continue to play until a new SOUND command is executed for the same voice. To completely silence a voice, all parameters are conventionally set to zero, as in SOUND 0,0,0,0. To make music, we could simply write a SOUND statement for each note, but of course there’s a better way using looping and the DATA statement.
 This single DATA statement (line 2600) contains pairs of values for duration and pitch, meaning that every other number corresponds to a note on the piano keyboard chart above. We use the duration number to specify how long to wait until we play the next note, essentially designating if the note is whole, half, or quarter in a music notation context. At the end of the “song,” we add a -1 to indicate the end of the tune. In case you’re wondering, Space Assault’s theme music is my own simple version of the score to Disney’s The Black Hole (1979). Listen to the slow horn melody under the strings and you’ll hear the notes contained in this DATA statement.
First, we start sounding a drone note with one of our voices (line 2550). This note will play throughout all of the other notes, providing a very simple harmony. Next, we read the duration value into DUR, checking for -1 to see if we should start the tune over again (line 2560). Then we read the pitch value into TONE and play the note with two voices. The second voice uses one pitch value less than TONE, which creates a kind of resonance that makes the music slightly thicker and more interesting. Then we wait the appropriate amount of time via an empty FOR loop using DUR. We multiply DUR by 12, which essentially indicates the tempo for our music. Using a lower number would increase the tempo, and a larger number would slow the tune down. After waiting, we silence the two voices playing the note (line 2570).
While the theme music is playing, the game is waiting for the player to press the Start key, one of the dedicated physical function keys on the Atari home computer keyboard. These keys are labeled Start, Select, and Option, and they are read by PEEKing register 53279. If this register contains a 6, this means the Start key is depressed, so we silence our drone note and continue with the game (line 2580).
300 PRINT “Lasers and Explosions”
While we’re on the subject of sound, let’s take a moment to examine a few of Space Assault’s sound effects that we skipped over in Lesson Six, now that we understand how the SOUND statement works. Our “Random Ship” subroutine includes a distinctive background sound for each kind of ship.
 These SOUND statements use the third voice with a quiet volume of 3, and each of them use a distortion value other than a pure tone. A Combat Saucer creates a high hiss (line 1330), a Devastation Satellite creates a low rumble (line 1340), and a Purple Marauder creates a medium whine (line 1350). Since a voice will continue to make a sound until it is silenced, all we need to do is start these effects with a single SOUND statement, and the effect will play without further code.
Much more interesting effects can be generated by using the SOUND statement in a loop, such as when an alien fires its laser in the “Destroy VPP” subroutine.
 The outer loop repeats the effect five times, while the inner loop controls the pitch of the sound effect. By looping from 9 to 50 and incrementing by 3, the SOUND statement produces a tone that quickly falls from high to low pitch (line 1830). Even though we’re using a pure tone for the distortion value, this type of effect has become well-known as what lasers sound like in games of the 8-bit era.
 A very similar loop creates the explosion sound when one of our bases is destroyed, using a distortion value of 0. The particular distortion sounds like static, so by changing the pitch from 0 to 50, we get a sound quite similar to a violent explosion diminishing as it ends (line 1880). As described in Lesson Six, the SETCOLOR statements cause the playfield background to strobe to really sell the effect.
310 PRINT “How to Play”
After our player has fully appreciated our title screen and music, they press the Start key to continue. Space Assault then offers the choice to read a “mission briefing” before playing. Much like the title screen, many home computer games of this time included simple instructions as part of the experience. If the game was simple enough to play without explanation, then at least an interesting backstory was included to establish the atmosphere of the game. Of course, I wanted to present my creative scenario about Earth’s desperate struggle, after getting the player’s permission with some large text.
 The Atari’s versatile ANTIC chip provides several different graphics modes, set by using the GRAPHICS statement. For the entire Adventures in Atari Basic series, we’ve been using Graphics 7, the most popular bitmapped graphics mode, which provides a grid of pixels for us to use with PLOT and DRAWTO statements. There are also three text modes available: Graphics 0 displays normal text, Graphics 1 displays medium-sized text, and Graphics 2 displays very large text, which we’ll use here.
 After switching the graphics mode to “large text” and setting our colors (line 2610), we need to display our important question to the user. The POSITION statement is similar to the PLOT statement, but instead of filling a pixel, it moves the cursor to a set of character coordinates, horizontal and vertical. POSITION 3,3 (line 2620) puts the cursor on the third column of the third line, so when we print our text, it will start from this spot.
The next statement that begins with a question mark looks strange, but it’s really only a PRINT statement in disguise. Atari BASIC allows abbreviations for most statements, and “?” is the abbreviation for PRINT. Abbreviations allow the programmer to fit more on a single line of code, making the overall program shorter and faster, once again due to the nature of the Atari BASIC interpreter. The “#6” specifies an Input/Output Control Block (IOCB), which references the device to which we are PRINTing. In this case, the device is the screen, and IOCB 6 is automatically opened when using Graphics 1 or 2. When using a text mode other than Graphics 0, the PRINT statement requires this IOCB number.
Since we have asked the player to respond to our question with “Y” or “N,” we need to check for those keystrokes. We can do this with another Input/Output Control Block referencing the keyboard as its device. First, we use the OPEN statement, which lets us specify an IOCB number, whether we are reading or writing to the device, and a letter to identify the device. The statement OPEN #1, 4, 0, “K:” opens IOCB 1 for reading the keyboard. Next, we use the GET statement to actually read from the IOCB, putting the value in variable A, and then close the IOCB (line 2640). When this line of code finishes executing, variable A will contain the ATASCII code of whatever key was pressed on the keyboard. If the character code is 89 (Y), we jump to the code that displays the mission briefing (line 2650). If the character code is 78 (N), we RETURN from our subroutine back to the code that draws the playfield and starts the game (line 2660). If any other key is pressed, we simply get another key until the player presses Y or N (line 2670).
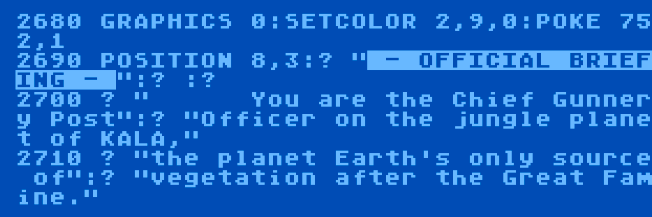 If the player decides to read the briefing, displaying the text is quite simple. We switch to Graphics 0, which is the standard 40 column text mode, set the background color with SETCOLOR, and then POKE register 752, which hides the cursor that normally appears when using Graphics 0 (line 2680). The next several lines of code are only POSITION and PRINT statements to display the backstory and instructions, using both lowercase and inverse text styles available in ATASCII.
 The briefing is displayed as two screens of text, and we progress to the next screen by once again opening an Input/Output Control Block for the keyboard as we did earlier, but this time there’s no need to check what key was pressed, since any character is fine (line 2830). After the final screen of text is displayed and the player presses a key, we RETURN from this subroutine and start the game (line 2840).
320 PRINT “Merciless Music”
For this lesson’s variations on the original code, I’ve replaced the Space Assault theme music with a tune from another science fantasy classic, Flash Gordon (1980). Around the same time that I wrote Space Assault, I was also dabbling with consumer synthesizers, and I enjoyed playing the somewhat creepy “Ming’s Theme,” so this choice of music is definitely appropriate for Space Assault. The code still uses DATA statements with pairs of numbers representing pitch and duration, but I’ve changed the way they are played a bit.
 The first change is that now each note is played by three voices, each playing the note one pitch value apart (line 2565), which creates an even fuller, more ominous tone than we experienced before with two voices. The next change is that each note is quickly “faded in” inside a FOR loop, which uses STEP to increase the speed of the loop based on the duration of the note (line 2560). This means that short notes will fade in faster than long notes, so the fade-in effect doesn’t affect the tempo of the music. Finally, I’ve moved the check for the Start key to the inside of the loop that holds each note for the specified duration. In the original code, the Start key was only checked at the end of each note, so if the Start key was pressed in the middle of a long note, nothing would happen. Checking the Start key during the note itself eliminates this problem, which I should have fixed as a teenager. The end result is a new Space Assault theme that sets the mood for inevitable destruction!
Next time we’ll discover how to combine multiple graphics modes with a custom display list by looking at Space Assault’s “game over” screen, then use this technique to completely redesign our title screen.
![]() Mikey Walters lives in Austin, Texas, and has an entire room devoted to toys, including Mego figures, Japanese kaiju, and over 1,000 PEZ dispensers. He spends his time thinking about how great it is to be a geek who grew up in the 1970s.
Mikey Walters lives in Austin, Texas, and has an entire room devoted to toys, including Mego figures, Japanese kaiju, and over 1,000 PEZ dispensers. He spends his time thinking about how great it is to be a geek who grew up in the 1970s.


Pingback: Adventures in Atari BASIC: Lesson Eight – Multiple Graphics Modes and Marquee Text
Enjoyed this series. Thanks. I co-host ANTIC, a podcast about Atari 8-bits that you might enjoy. Also, if you’re getting back into Atari BASIC programming, you might want to check out the annual 10-line BASIC programming contest. It’s lots of fun.
What an awesome tutorial! I spent my youth trying to figure out how to program games but I couldn’t quite wrap my head around it so I spent my time typing in games from Atari magazines.
Maybe it just took 40 years for all the stuff I tried to understand back then to sink into my thick skull but you managed to bring together all of the concepts I read about in a really easy way to follow.
Modern computers are way too complicated for amateurs to code games for IMHO. It takes forever just to set up the IDE and figure out how to compile your code and then you have to deal with all of the necessary libraries and whatnot. And you practically need to be an artist to make any reasonable looking game.
Programming the Atari 8-bit is much more approachable and enjoyable.
Thanks