By Mikey Walters / October 10, 2016

This is the second in a series of articles about programming in Atari BASIC. The first installment is here. Space Assault source code and references can be found here.
40 PRINT “Draw Your Weapon”
In Lesson One, we learned that the first step in the execution of an Atari BASIC game is usually drawing the playfield, which had to be done pixel by pixel. We plotted 50 random stars as a start, leaving Space Assault’s playfield somewhat less than exciting. Let’s continue by drawing the game’s only weapon, the mighty Fission Gun Tower!
If you recall, the COLOR statement is used to pick one of the colors that we defined earlier using the SETCOLOR statement. You can think of this as choosing which color “marker” to use. Also remember that the PLOT statement uses the current color to fill in a single pixel using an X, Y coordinate, with 0, 0 being the top left corner of the screen. It’s helpful to think of the entire screen as a sheet of graph paper, and to fill in the squares (pixels) to make what we want to see. In fact, that’s exactly how I would start “programming.” Using actual graph paper, I would sketch the image I wanted to create, so I would have a reference for exactly which pixels needed to be filled in with each color. Let’s zoom in and look at the tower’s pixels.
 Using what you already know, you could draw this tower entirely with COLOR and PLOT statements, filling in each pixel (or square of the graph paper) one at a time—but this would be extremely tedious. Thankfully, we can make it a little less painful with two helpful tools. The first is the DRAWTO statement, which uses an X, Y coordinate just like the PLOT statement. DRAWTO will draw a line from the last PLOT or DRAWTO to the given coordinate. Essentially, it remembers where your last marker was on the graph paper, and draws a line from there to wherever you specify, which is a huge timesaver.
The next tool is using FOR loops to help with a repetitive task, such as drawing a series of lines from the top of a shape to the bottom. This really boils down to programming skill and learning how to think logically, essentially figuring out how to do something with less code. We’ll see several examples of this when we actually draw the tower.
It’s interesting to note that almost all of this hard work was mostly obsolete by the mid-1980s, when more sophisticated graphics commands became available. For example, by using QuickDraw, part of the original Macintosh system software (1984), a single command could easily draw a rectangle or an oval and even fill it, all of which was done by hand in Atari BASIC.
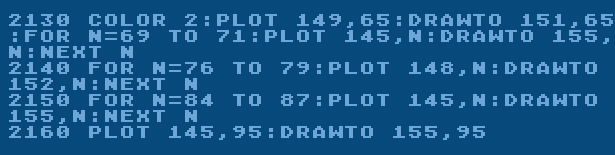
Let’s begin by selecting gray (COLOR 1) and drawing the gray parts of the tower. It will be helpful to refer to the tower image above to follow along.
 After plotting the single pixel at the top, we use a short FOR loop to draw the gray box, which is constructed of three horizontal lines. Using the loop variable N as the vertical Y coordinate, we can PLOT and DRAWTO in the same horizontal coordinates three times (line 2090). This short loop only saves us a few commands, but it’s a good example of using less code when possible. Interestingly, since Atari BASIC is an interpreted language, it actually runs faster if the code is “tighter” and more efficient.
Moving down the tower, we need to draw a couple of triangle shapes. Here we’re using a FOR loop again with the loop variable N as the vertical Y coordinate, but we’re also using a second variable, AD, to “add” to the horizontal X coordinate. Each time through the loop we increase AD, which is then added and subtracted to the horizontal ends of the line. Using this method, we draw an upside down triangle shape (line 2100), and then similarly draw the mirror image below it (line 2110). Finally, we draw the bottom box (the black “windows” will come later) just like we drew the top box (line 2120).
Now let’s switch colors (COLOR 2) and draw the purple parts of the tower. There’s a simple short line at the top, and then three boxes all constructed with FOR loops. Finally, we finish the purple with a long line at the bottom (line 2160).
 Now we need to draw the black (COLOR 0) “windows” on top of the bottom gray box, using some new concepts (line 2170). The first is nested loops, which in this case is a FOR loop inside of another FOR loop. This allows us to use the loop variable N as the vertical Y coordinate and the loop variable A as the horizontal X coordinate. The next concept is using STEP on our FOR loops. Normally the loop variable of a FOR loop increments by 1 each time through the loop. For example, in the statement “FOR N=1 to 10”, the loop variable N has the value of 1, 2, 3, and so on as the loop progresses. But if we add “STEP 2” to the statement, then N will be incremented by 2 each time, giving values of 1, 3, 5, and so on. So by using STEP 2 in both loops, we can skip every other pixel both horizontally and vertically. Inside of both of these loops is the single statement PLOT A, N, which is as efficient as we can get.
 Finally, we switch back to gray (COLOR 1) to draw the “claws” on both sides of the tower. There’s not much we can do here to reduce lines of code, so we just draw what we want with straightforward PLOT and DRAWTO statements (line 2180), and the Fission Gun Tower is finished.
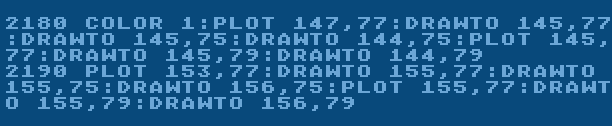
50 PRINT “Cookie Cutter Bases”
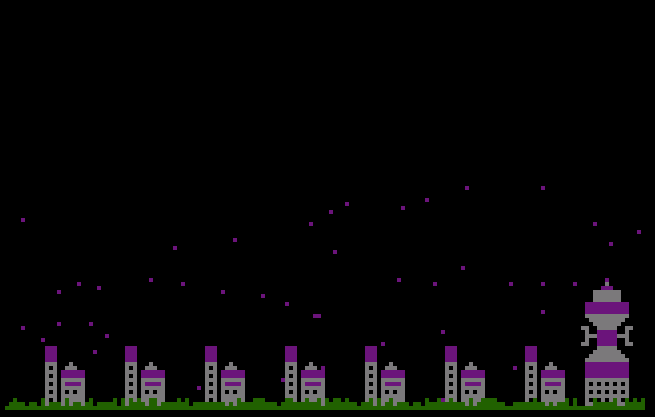
Now we’re ready to draw our seven bases (called Vegetation Processing Plants in the backstory) that we must protect from our enemies. From what we’ve learned by drawing the gun tower, the details of drawing each base are easy to understand. We use the same colors, FOR loops, drawing windows with STEP, and so on.
 Since each base is identical, we could simply repeat all of this code seven times, adjusting the horizontal position a little each time. But to really reduce our lines of code, we can use one big FOR loop, stepping by 20 pixels each time through the loop (line 2200). Inside the loop, our horizontal X coordinate in all of our PLOT and DRAWTO statements will always be an offset of the loop variable N, which will draw a base at horizontal coordinates 10, 30, 50, 70, 90, 110, and 130. This rubber stamp or “cookie cutter” technique really makes our code smaller, which is always a programmer’s goal.

60 PRINT “Jungle Planet”
According to the backstory, the action in Space Assault takes place on the jungle planet Kala, rich with vegetation that Earth desperately needs. Accordingly, the last touch to our playfield is some random greenery, which also provides a platform for the bases. Thankfully, this jungle effect is accomplished with only a single line of code (line 2300).
 After selecting green (COLOR 3), we loop across the entire horizontal dimension of the screen. Each time through the loop, we PLOT at the bottom of the screen and DRAWTO a slightly higher vertical coordinate, determined by the RND statement. Using this random number and a little math, each green line is between 1 and 3 pixels tall. When this is repeated across the screen, the vegetation looks somewhat natural. Incidentally, this drawing is done after the bases are complete, since we are randomly drawing over the bottom portion of each of the bases, giving them a feel of being surrounded by vegetation. The Space Assault playfield is now complete!
70 PRINT “Variations”
In each article of “Adventures in Atari BASIC,” I’d like to try out some variations to the 1983 source code. Along the way, I’m hoping to remember interesting programming aspects I’ve forgotten, and possibly improve Space Assault in ways that I didn’t or couldn’t come up with at the time. Rather than cover the new code line by line, I’ll only present discoveries I find interesting.
Since all we have is a playfield at this point, I’ve only updated the look of the graphics somewhat. I started by adjusting the colors a bit to make them a little brighter, and then modified the Fission Gun Tower to include a kind of dish at the top. I did this exactly as I described earlier, by sketching the image on graph paper and figuring out the coordinates of each pixel. We can draw the dish with standard PLOT and DRAWTO commands.
 For the bases, I changed the smaller structure on the right and added some “pipes” to connect the buildings—they’re supposed to be “Vegetation Processing Plants” after all.
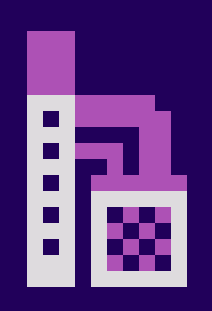 I decided to add a checkerboard pattern to the small building using nested FOR loops, just as we did for the windows in the Tower Gun. I figured the color swapping could be done with a simple IF-THEN-ELSE statement, until I realized that Atari BASIC does not support ELSE! This was a complete shock, and I was amazed that my formative years of programming were spent without such an essential statement that exists in every other programming language to this day. However, there’s always another way.

Each time through the loop, we set the color to purple (COLOR 2). Then we check the sum of the horizontal and vertical coordinates to see if the number is odd or even using the INT function, determining whether dividing by 2 produces a remainder (line 2271). If the number is even, we set the color to the background color (COLOR 0). Then we PLOT the pixel and continue looping. This allows us to swap colors with each iteration of the loop, making the intended checkerboard pattern.
 Next time, we’ll start discussing player sprites—known as Player-Missile Graphics to Atari aficionados—and learn how to build enemy spaceships with binary numbers.
![]() Mikey Walters lives in Austin, Texas, and has an entire room devoted to toys, including Mego figures, Japanese kaiju, and over 1,000 PEZ dispensers. He spends his time thinking about how great it is to be a geek who grew up in the 1970s.
Mikey Walters lives in Austin, Texas, and has an entire room devoted to toys, including Mego figures, Japanese kaiju, and over 1,000 PEZ dispensers. He spends his time thinking about how great it is to be a geek who grew up in the 1970s.


So cool. I learned more about Atari BASIC in this article than I ever learned in the years that I owned my 800XL…but then again, I never really bothered to learn much more than the copy-coding that I did for the COMPUTE! games—most of which I didn’t understand (I just wanted to create a game!).
The grid and graph paper concept totally brought me back to 1982-83, when I was in 7th-8th grade and was taking a Basic Computing Class which used TRS-80s. There was this small, exclusive faction of “elite” programmers who kept to themselves in one corner of the room, and appeared to be collectively working on an original game. They weren’t really open to outsiders, but I sat close enough to one of them to be able to sneak a peek at what he was up to. He must’ve been assigned to creating the game’s characters, because he would pull out sheets of graph paper from his backpack on a daily basis, and set them beside his keyboard as he clacked away.
Each sheet was filled with an assortment of pixelated people and creatures that were carefully plotted out on the graph and colored in with markers. As the school year went on, his characters became more and more complex, with variations in poses and what not. Often times, cryptic notes were scrawled on the side margins. It really piqued my curiosity, but I never got the chance to meet him nor find out what the heck they were all working on, and if the project ever came to fruition.
I always wonder what happened to that elite squad and where they ended up afterwards. They were all so intensely focused on their project, almost always coding in silence and staring at their monochrome monitors, every now and then turning to each other and cracking some random nerdy jokes. They brought in their lunches and ate—normally food wasn’t allowed in class, but they were so buddy-buddy with the teacher that he let them slide, especially since they were really taking advantage of the resources and doing something productive with it. Most of the other students saw the class as a free period to do whatever they wanted aside from BASIC programming.
That’s the thing about it all, too…back then one really had to like doing that sort of stuff. There was so much involved—it was like learning a new language altogether! What average tween or teen at the time, exposed to the likes of girls, BMX bikes, arcades and MTV would’ve had the patience and/or attention span to sit and code??
Great memories! I think I would have been in that corner group. I was in a High School honors class called “Math Seminar”, which had no curriculum, but you had to stay productive with the Apple IIs, which was no problem! My pals and I had a contest for who could plot a circle the fastest in BASIC (hint, using tangents was faster than sine/cosine). I actually spent most of that class writing a scoring program for the school swim meet, and they actually paid me $100, so in a way I was paid for going to school! What a wonderful world!
I’m glad you enjoyed the article! I think the next in the series will really blow your mind!
I’m loving these, Mike – if you could get around to a series tackling colour-clash on the Spectrum, that would be massively appreciated too.
Thank you! Actually, my first computer was a ZX-81, so of course I never had to deal with color issues. Getting that 16K RAM module to stay put was another thing entirely!
RAM-pack wobble was a big one, solved in my household by the liberal use of the Blu-tack my dad routinely filched from work.
Pingback: Adventures in Atari BASIC: Lesson Three – Enemy Ships and Player/Missile Graphics | We Are the Mutants
Pingback: Adventures in Atari BASIC: Lesson Four – Manipulating Memory and Moving Players | We Are the Mutants
Pingback: Adventures in Atari BASIC: Lesson Six – Enemies and Earthquakes
Pingback: Adventures in Atari BASIC: Lesson Seven – Music and Mission Briefings