By Mikey Walters / November 28, 2016

This is the third in a series of articles about programming in Atari BASIC. The first and second installments are here and here, respectively. Space Assault source code and references can be found here.
80 PRINT “Draw, Erase, Repeat”
In Lesson Two, we finished drawing Space Assault’s playfield, complete with our seven Vegetation Processing Plants that we must protect with the Fission Gun Tower. The planet Kala is strangely quiet, which can only mean the Clovis aliens are ready to attack—as soon as we learn how to get them on the screen!
By now you should have a good understanding of how to use PLOT and DRAWTO to create just about any image you like. But how do we make an image appear to move? If you wanted to animate an enemy ship moving horizontally (left to right) using PLOT and DRAWTO, you would need to draw the ship in color, erase it by drawing it again with the playfield background color, draw it again a few pixels to the right, erase it again, and so on, over and over again. This simple animation principle certainly works, but has the disadvantage of being somewhat slow. And if our ship travels over something we’ve drawn previously, that too will be erased, along with the ship. Of course, there’s a better way to animate our ships using one of the best features of Atari home computers.
90 PRINT “Revolutionary Graphics”
If you take a quick look at popular Atari computer books and magazines of the 1980s, you’ll soon discover article after article on Player/Missile Graphics, which was Atari’s name for what are commonly called sprites today. The Atari 400/800 was one of the first home computers to bring this powerful capability into the hands of amateur game programmers. As an Atari aficionado, the Player/Missile Graphics feature was something you could brag about to your TRS-80 and Apple II friends. Because it was so advanced (and unfortunately somewhat arcane), entire books were devoted to the topic. What makes Player/Missile Graphics so revolutionary?
First, sprites such as enemy ships, tanks, or robots are implemented as an overlay on top of the playfield. Much like cartoon animation uses transparent cels to overlay a character onto a painted background, Atari’s “players” basically float over the playfield we worked so hard to draw. This means that when they move across the screen, the playfield is totally unaffected. Next, sprites are “memory-mapped” to the screen, which works so much faster than using PLOT and DRAWTO. Essentially, after a sprite image is created in memory, it can be instantly displayed on screen. We’ll learn more about this in a moment.
The list of Player/Missile Graphics benefits goes on and on. We can work with four player sprites (plus smaller “missile” sprites) simultaneously, each with its own color. We can access automatic “collision detection” to immediately know when a player has touched another player or something on the playfield. We can even specify “priority” so a player can appear to move over or behind something drawn on the playfield, providing a feeling of depth. Amateur programmers who read about these powerful features in the 1980s couldn’t wait to learn how to use them in their own projects.
Player/Missile Graphics started conceptually with the venerable Atari 2600 or VCS, whose hardware was designed to support popular arcade games of the era. The 2600 included two player sprites and missiles (since there were two joystick ports), plus a unique “ball” sprite for Pong-style games. When the Atari home computer hardware was designed, these graphics capabilities were improved and divided between two custom chips. Playfield graphics like the ones we’ve been drawing are handled by the ANTIC chip, and the GTIA chip overlays sprites on the playfield.
Unfortunately, Atari BASIC includes no built-in statements to use Player/Missile Graphics. This means that although the computer hardware is capable of flying our enemy ships across the screen, we don’t have an easy way to tell the computer to do it. Instead, we have to directly manipulate specific parts of computer memory, and that’s why Player/Missile Graphics was a somewhat mysterious topic and a bit daunting to novice programmers. I’m going to explain the Player/Missile Graphics methods used in the Space Assault source code as simply as possible, without getting too overwhelmed in details. In fact, we won’t even learn how to activate Player/Missile Graphics until our next lesson. For now, let’s learn how to build those deadly Clovis ships.
100 PRINT “Building with Binary”
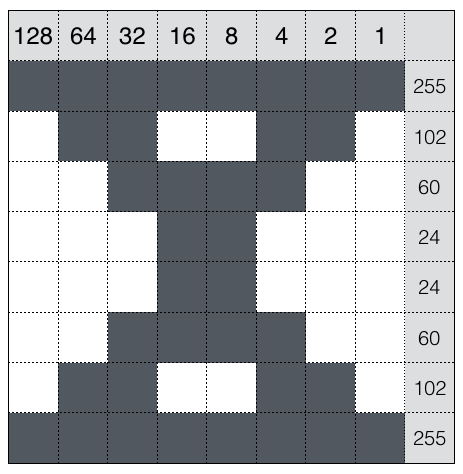
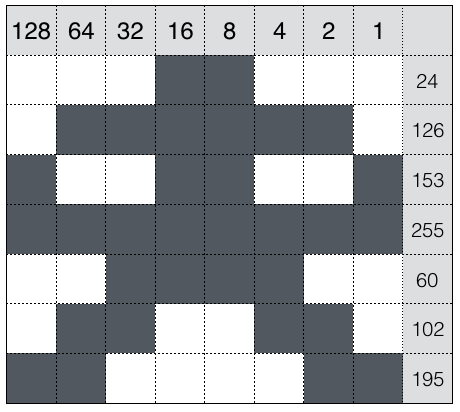
As mentioned earlier, player images are created in memory and “mapped” to the screen. Rather than drawing the player with PLOT and DRAWTO statements, we need to specify what the pixels of our player should look like as bytes in memory, starting with the binary number for each row of pixels. A byte contains 8 bits, so our player can be 8 pixels wide. To begin, it’s helpful to sketch out the design on graph paper, so let’s take a look at the first enemy ship, a traditional flying saucer shape.
 Each square of the graph paper represents a bit, which can be filled or empty (1 or 0). The first row of our saucer represented as a binary number is 00111100, since the first two squares are empty (0), then four squares are filled (1), followed by two more empty squares. To store these binary numbers in memory, we have to convert them to decimal numbers, which isn’t so bad. Take a look at the header row with the values 128, 64, 32, 16, 8, 4, 2, and 1. By adding up these header values for the filled pixels, you’re actually converting a binary (base 2) number to a decimal (base 10) number. You may notice that if all of the squares in a row are empty, the decimal number is 0, and if all of them are filled, the number is 255, which makes sense because a byte by definition may contain the values 0 through 255. Converting each row of our saucer provides the decimal numbers shown in the rightmost column above. You could also use any of several binary-decimal converter websites, but I always managed using the above method as a 16-year-old with no internet!
When these numbers are put into memory, the computer sees them as the binary image of our saucer and can display it instantly, without any PLOT or DRAWTO commands to draw the saucer shape or window details. Instead, the player is literally “mapped” onto the screen. This is how Player/Missile Graphics can be so much faster than the “draw, erase, repeat” method, since it’s actually much less work for the computer.
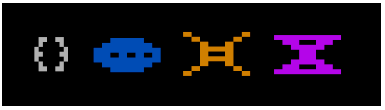
Let’s look at our other enemy ships. The next one is a simple satellite design.
 Note how this player is taller than our saucer. Although players are only one byte (8 pixels) wide, they can be any height, including the full vertical size of the screen. Our last enemy ship was inspired by the Cylon Basestar from the original Battlestar Galactica.
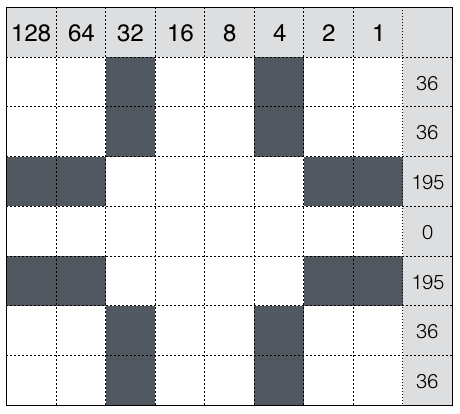
 The last player image is for the crosshair that determines where the Fission Gun Tower will fire.

110 PRINT “Top Secret Data”
Now that we have the numbers that define all of our player images, it’s time to get them into memory. Let’s finally look at some code and learn some new Atari BASIC statements.
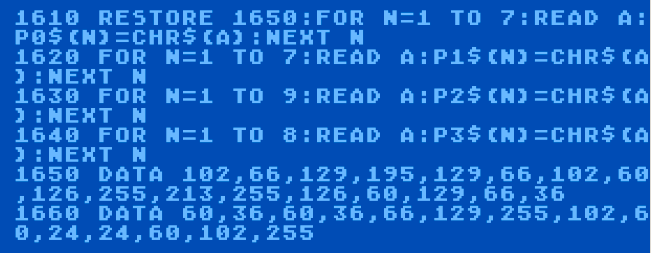 Our new statements are READ, DATA, and RESTORE, which are used together to work with sets of arbitrary numbers for a variety of purposes. In this case, the numbers are the decimal values we’ve computed that define our player images (lines 1650-1660). The DATA statement just keeps a list of numbers ready to be accessed, and the READ statement will get the next number in the list and store it in a specified variable. Since DATA statements can appear anywhere in a program, the RESTORE statement tells the program what line number to start with for the next READ statement.
Many program listings that appeared in computer magazines of this era were full of DATA statements. They were incredibly difficult and tedious to type, and it was easy to make mistakes, which often caused the program to fail. Every young programmer I knew had spent hours with a friend or parent who dictated long lists of numbers to make the process easier and less prone to error. Various magazines even invented their own verification programs, which would essentially check over your code to help you find typing errors. Thankfully, Space Assault’s DATA statements aren’t nearly as complex, relatively speaking.
After specifying where our numbers are with RESTORE, we use a FOR loop for each player, paying attention to the height of the player to loop through the correct number of bytes. The next number in our DATA is READ into variable A, and then stored in a separate variable for each player. These are string variables that we’ll explain in the next lesson, and for now we only need to know that our crosshair image is loaded into a variable called P0$, then our saucer is loaded into P1$, our satellite into P2$, and finally our Basestar into P3$. Those variables are now in memory, so they can be “memory-mapped” to the screen once we activate Player/Missile Graphics.
 You might notice that our players look a little wide. This is because the code that we’ll see in the next lesson is using another handy feature of Player/Missile Graphics that can automatically double or quadruple a player’s width. For Space Assault, I used the double width option to make the aliens ships somewhat larger and easier to hit.
120 PRINT “New Invaders”
For this lesson’s variations on the original code, I couldn’t resist changing the alien ships into simple versions of Space Invaders shapes. I also tweaked the crosshair design.
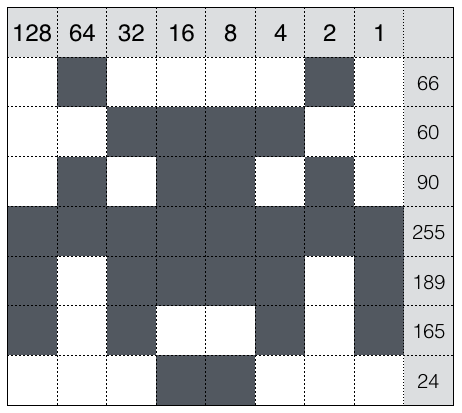

 Using the computed values from these images, along with some new colors that look better on our revised playfield from Lesson Two, our players have quite the new look!
 Next time we’ll learn how to activate Player/Missile Graphics and actually move these images around, all with the magic of PEEK and POKE.
![]() Mikey Walters lives in Austin, Texas, and has an entire room devoted to toys, including Mego figures, Japanese kaiju, and over 1,000 PEZ dispensers. He spends his time thinking about how great it is to be a geek who grew up in the 1970s.
Mikey Walters lives in Austin, Texas, and has an entire room devoted to toys, including Mego figures, Japanese kaiju, and over 1,000 PEZ dispensers. He spends his time thinking about how great it is to be a geek who grew up in the 1970s.


Pingback: Adventures in Atari BASIC: Lesson Four – Manipulating Memory and Moving Players | We Are the Mutants
Pingback: Adventures in Atari BASIC: Lesson Six – Enemies and Earthquakes
Pingback: Adventures in Atari BASIC: Lesson Eight – Multiple Graphics Modes and Marquee Text
I stand by my opinion that PM was the one really underdeveloped part of the Atari platform. The need to move the entire bitset up and down in memory, especially on a 6502, is a significant problem. It would have been *very* easy to add a second register on the GTIA that recorded the vertical offset and then began reading the pattern when the VCLOCK got to that number (this is how the ANTIC did smooth scrolling for instance). This would have allowed them to move up and down with a single POKE, so BASIC would have been much more effective for gaming. It would also allow the patterns to be much smaller than the 256-bytes they required.