By Mikey Walters / January 30, 2017
 This is the fourth in a series of articles about programming in Atari BASIC. The previous installments are here, here, and here, respectively. Space Assault source code and references can be found here.
130 PRINT “Memory Lane”
In Lesson Three, we learned about Atari’s revolutionary Player/Missile Graphics and spent some time designing Space Assault’s players (or sprites), including enemy ships and the crosshair of the Fission Gun Tower. Now it’s time to make our players move, but, if you remember, Atari BASIC includes no built-in commands to harness the power of Player/Missile Graphics. However, it does include two extremely useful tools that will get the job done: PEEK and POKE.
Quite simply, the PEEK command looks at a specific location of computer memory, and the POKE command allows us to change the contents of a location. Think of memory as simply a long series of bytes, each numbered with an address. The command PEEK 100 will return the value stored in memory address 100, and the command POKE 100, 255 would store the value 255 into that address. This sounds a bit mundane, but when you realize that everything the computer does is based on the contents of memory, you’ll see that anything is possible using PEEK and POKE.
The true usefulness of manipulating memory is found in changing the values of registers. A register is no different from any other memory address, except that the Atari computer constantly monitors the values stored in registers, and changes in these values make things happen. Actually, some of the BASIC commands we have learned are really just a POKE in disguise. For example, we’ve seen that the SETCOLOR command specifies a color for use with PLOT and DRAWTO. The command SETCOLOR 4,0,0 sets the background color of the playfield to black (4 means background, and 0,0 are hue and luminance values). When this command is executed, what really happens is POKE 712,0. This is because memory address 712 is the “background color” register. The Atari hardware continuously looks at the value in register 712, and changes the background color of the playfield accordingly. The SETCOLOR command only exists to make it easier for BASIC programmers, so they won’t have to remember that 712 is the register, or do the math to convert hue and luminance values into a single byte.
As you might imagine, there are several registers dedicated to controlling Player/Missile Graphics, and since Atari BASIC doesn’t provide any commands like SETCOLOR for these registers, we have to learn their memory addresses and POKE them ourselves. Although PEEK and POKE commands were a staple of most home computer BASIC programs in the 1980s, today’s programming environments make a tremendous effort to prevent anything resembling direct memory manipulation. Since modern operating systems allow several programs or processes to operate simultaneously, it’s important to prevent one program from “stepping on” another. PEEK and POKE would be a hacker’s dream if protected memory management didn’t exist today.
140 PRINT “String Theory”
Before we start POKEing, we need to make a short detour to discuss “string” variables. A string is simply a text variable, meaning it represents a series of characters rather than a numerical value. String variables are notated with a dollar sign, such as A$ or NAME$. In Atari BASIC, string variables have a fixed size that is specified with the DIM statement (short for “dimension”). For example, DIM A$(10) means that the string variable A$ can contain 10 characters. Each character of a string can be referenced by using an index, so A$(3) refers to the third character of A$.
Looking back at Lesson Three, after figuring out the byte values for each row of our player images, we used a FOR loop to READ each byte from our DATA statements, and then used a function called CHR$ to convert each of our bytes into a character, which was assigned to an index of a particular string.
 The CHR$ function returns the character represented by a specific number in the ATASCII character set (Atari’s extended version of standard ASCII). We don’t really care what these characters are, but we need to convert our bytes into characters since string variables only contain text.
Why in the world have we done this? Again, it’s all about memory. When programming Player/Missile Graphics, the memory location of each player’s image data must be known. When we DIM a string variable, the Atari sets aside a location in free memory that’s just the size we need, and we can now obtain that location by using the ADR statement. For example, ADR(A$) will tell us the address of the memory containing the bytes of A$. So, if our player image is stored in a string variable called P1$ (as in line 1620 above), then we can tell the computer that our player image is located in memory at ADR(P1$). Let’s take a look at the first few lines of our Player/Missile Graphics initialization.
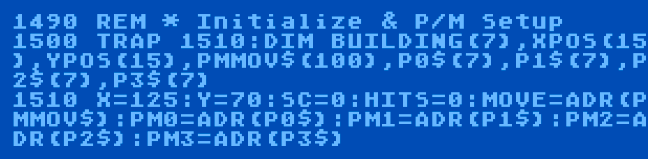 You’ll notice that we can include multiple variables in one DIM statement, so we first specify several string variables (line 1500). Note that we have four player strings: P0$, P1$, P2$ and P3$. Each of these are sized with the height of the player images we designed in Lesson Three. Next, we store the memory address of each of these strings into variables called PM0, PM1, PM2 and PM3 (line 1510). Now we can easily tell the Atari where the image bytes of each of our four players (three alien ships and our crosshair) are in memory.
150 PRINT “Moving Through Memory”
Before continuing, we need to discuss how the Atari actually determines where a player is displayed on the screen. Another topic we mentioned in Lesson Three was “memory mapping,” meaning that players are directly mapped onto the screen from their binary representation. The location of a player is controlled by two factors: the value of a horizontal position register, and the spot where the player’s bytes exist in a consecutive area of memory.
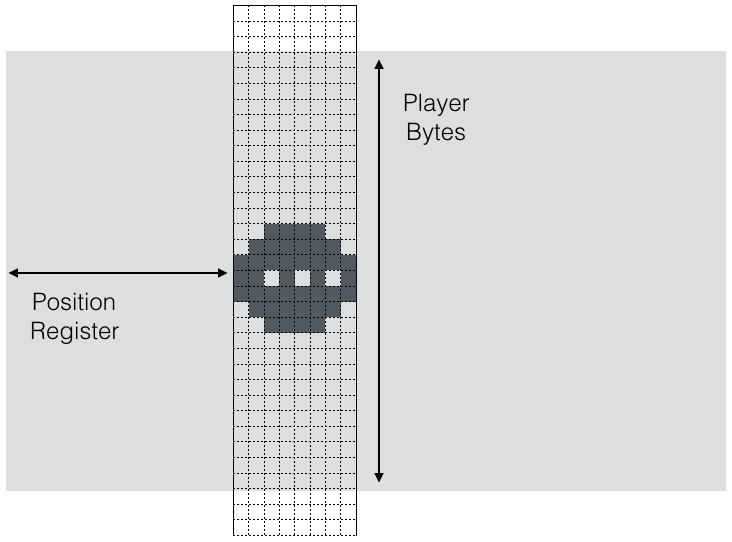 For each player, a series of consecutive memory addresses is reserved that construct a kind of “strip” from the top to the bottom of the screen. If the player bytes are located at the beginning of the strip, it will be mapped to the top of the screen, and if the player bytes are located at the end of the strip, it will be mapped to the bottom of the screen. Actually, this strip extends past the visible screen area, so players can move off screen where they are no longer visible.
The player’s horizontal position is stored in a dedicated register for each player. Simply POKEing a value into this register will instantly pop the player to a new position, making horizontal movement extremely easy. Vertical movement is a bit more difficult, since we need to copy our player bytes into a different location along the memory strip, which we’ll discuss in a moment.
160 PRINT “Initializing Player/Missile Graphics”
It’s finally time to fire up Player/Missile Graphics by POKEing all of the necessary registers. Our first task is to tell the Atari what part of memory to use for the player memory strips we just described. To do this, we need to find out where some free memory exists, which we can do by PEEKing into register 145, where the Atari stores the beginning address of free memory.
 After performing some unusual math on the value of PEEK(145), we store this location in a variable called PMBASE (line 1670), the base address of our player memory strips. Truthfully, I never fully understood the formula being used here, since I copied it from other articles I read when I was learning Atari BASIC as a teenager. As I mentioned in Lesson Three, my goal is to explain the concepts of Player/Missile Graphics without getting stuck on elements that I’m sure scared away other young programmers at the time. The important thing is understanding why we need this memory address for the player memory strips.
The next step is to assign a color to each player, which is POKEd into registers 704 through 707 (line 1680). These values are computed by using a simple formula, multiplying a hue value by 16 and adding a luminance value.
Next, we specify our player “priority” so that our players will be drawn over the playfield (register 623). Other values for this register could allow players to move underneath the playfield, which would look funny against our starry sky, but would look great if we wanted our ships to move behind clouds, for example. Then we specify that each of our players should be double-width (registers 53257-53259), which makes them a little easier to hit with our Fission Gun, as well as double height (register 559). Finally, Player/Missile Graphics are officially activated by POKEing register 53277.
At this point you may wonder how any amateur programmer ever learned to work with Player/Missile Graphics at all. How could anyone know all of these register addresses? For myself, the answer is that I read every scrap of documentation I could find in computer magazines and books, and then tried things out even if I didn’t fully understand what was going on. Even without the internet, there was a huge amount of sample code available to study, and the more I experimented, the more I settled into my own boilerplate way of initializing and working with Player/Missile Graphics. Today, nearly all of this knowledge is just a Google away, including Atari’s own official documentation, De Re Atari. This book was practically a magical tome to amateur Atari programmers in the 1980s, and it’s still fascinating to peruse today.
170 PRINT “Beyond BASIC”
We’ve just learned that moving a player horizontally is easy, thanks to the horizontal position register. You can imagine a simple loop that POKEs the loop variable into the horizontal position register, gliding our player smoothly across the screen at the same “altitude,” just like the bonus saucer in Space Invaders.
 This sample code (not part of the Space Assault source) will move our saucer (Player 1) from left to right across the screen, assuming our player bytes are positioned in a visible portion of our player memory strip. Player 1’s horizontal position is stored in register 53249, and the player is instantly moved when the value of that register changes. By the way, horizontal values below 48 and more than 198 are “off screen,” so moving the player beyond these limits would make it invisible.
But moving a player vertically requires a bit more work, since the bytes that make up the player image must be copied into new addresses along our player memory strip. If you think about it, this is similar to the “draw, erase, repeat” method we discussed in Lesson Three, but much less time-consuming, since we don’t have to worry about PLOT and DRAWTO commands, thanks to Player/Missile Graphics memory mapping.
Unfortunately, even though this process is relatively quick, Atari BASIC can’t perform these operations quickly enough for a video game. Remember that Atari BASIC is an interpreted language, so our commands must be deciphered “on the fly” before the actual task is executed. The only solution to this problem is to bypass the BASIC interpreter, using the actual machine language that the 6502 processor in our Atari understands. Fortunately, when I was programming Space Assault as a teenager, I discovered another ANALOG Computing article by Tom Hudson that provided exactly the code I needed to make my game faster. This code bundled up everything necessary to position any player both horizontally and vertically at the same time, and essentially extended Atari BASIC with a new, extremely useful function.
Atari BASIC was designed with a “hook” that makes this extension possible: the USR statement (short for “user routine”). After loading machine language code into a particular location in memory, Atari BASIC can use the USR statement to tell the Atari to stop interpreting BASIC, execute the code at the specified location, and then return to BASIC and pick up where we left off. This forward thinking feature allowed programmers to perform powerful tasks without making the full jump into the somewhat difficult world of machine language.
The player movement machine language routine, provided as a series of bytes in a DATA statement in the ANALOG article, is loaded into a string variable, exactly like we did with our player images.
 The address of this string, which is ADR(PMMOV$), is then stored in a variable called MOVE (line 1510 above), which we will use to move our players in a single line of code. Let’s modify our sample code from above to add some vertical movement.
 We’ve added another variable for our vertical position, which is increased as the loop executes, moving our player from the top left to the bottom right of the screen. Our vertical variable is only increased every other time through the loop (using the method described in Lesson Two to draw our checkerboard pattern), because the vertical size of the screen is shorter than the horizontal length.
All of the work is done in the USR statement, which passes a series of variables to our machine language routine (line 9020). We include the address of the machine language routine itself (MOVE), the number of the player to move (1), the address of our player memory strips (PMB), the address of our player image bytes (PM1), our horizontal and vertical positions (X, Y), and finally the height of our player (7). Remember that the machine language routine also takes care of the horizontal position register, so we no longer have to POKE that ourselves. The variable A that is returned by the USR statement is ignored in this case, but other kinds of routines (such as advanced math functions) could return a result this way.
It’s interesting to note that rival BASICs available for the Atari later included built-in commands to perform memory movement quite similar to this routine. Atari Microsoft BASIC II included a MOVE statement that worked in much the same way and could have been used for speedy player movement.
* * *
Congratulations for making it to the end of the lesson, which was a little more technical than usual. Thankfully, we’ve finished learning the foundation of Player/Missile Graphics. Next time the real action begins: we discuss the Atari joystick and blasting our Fission Gun laser across the night sky.
![]() Mikey Walters lives in Austin, Texas, and has an entire room devoted to toys, including Mego figures, Japanese kaiju, and over 1,000 PEZ dispensers. He spends his time thinking about how great it is to be a geek who grew up in the 1970s.
Mikey Walters lives in Austin, Texas, and has an entire room devoted to toys, including Mego figures, Japanese kaiju, and over 1,000 PEZ dispensers. He spends his time thinking about how great it is to be a geek who grew up in the 1970s.


Mikey, thanks for a peek onto memory lane 😉 and the detailed description. The way you had complete control over your machine is indeed hard to imagine from today’s viewpoint and the way you could experiment with BASIC by PEEKing and POKEing around and just trying out some commands and examine their effects was something I missed in later computers. I mostly stopped programming anything that came after the 8-bits.
So glad you enjoyed the article, Siegfried. After my childhood programming days, I got a Computer Science degree and I’m still coding for a living today. But regardless of how advanced programming tools and metaphors get, I still absolutely love the feel of Atari BASIC and being so close the machine. Stay tuned for the next article in the series. Collision detection and joystick control is fun!
Hi Mikey.
i found this article to be very useful, even tried the methods myself and it worked like a charm.
the only issue i have is that the assembler routine you published only deals with double line players.
i tried to use it with single line (poke 559,62) and it didn’t work. player appears in the same memory lane….
any advice? can you refer me to a subroutine that moves PMG (including missiles) that supports single line resolution?
thanks again
Thanks for actually trying out the code! This PM Move routine was written by Tom Hudson for ANALOG Magazine, so I just used it as described for Space Assault. The same author did write a second routine in a later issue to move missiles:
http://www.cyberroach.com/analog/an11/Missiles.htm
However, this doesn’t address your single line resolution problem. I found a very similar routine that seems to do what you want – single line with included missile movement support, so it sounds great to me. Of course, I haven’t tried this routine, and the book was written back in 1984, but it’s worth a try!
http://www.atariarchives.org/agagd/chapter5.php
Good luck and thanks for reading!
thank you Mikey for refering me to the page.
unfortunately this code doesn’t help me either. it keeps getting stuck and crash at the end.
and i think i know why. the routine is build to support PM graphics direcly when poking the player data into memory (i.e. poke PMBASE+70+i,A)
where i use strings to represent the players and eventually i set the memory of PMBASE to be the memory of the strings.
this USR routine presented in the page you’ve sent, doesn’t work with with string….
i remember seeing in the late 80s (i am getting old 🙂 ) somewhere in one of the magazine, a routine that is used to place the player on screen, it was also used to move the player and to animate the player. it was receiving x,y pos as parameters and also string of the player. i can’t find it anywhere….
can you help me to find a routine that will work for me?
again many thanks for all the help
I’m getting old, too! 🙂 I did a little more searching, but I didn’t come up with anything exactly like you describe. I’m sure there was a routine like that, but I only used the one from ANALOG Computing. Hope you eventually find something!
Pingback: Adventures in Atari BASIC: Lesson Five – Take Aim and Fire
Pingback: Adventures in Atari BASIC: Lesson Six – Enemies and Earthquakes
Pingback: Adventures in Atari BASIC: Lesson Eight – Multiple Graphics Modes and Marquee Text
Where are the 100 data bytes, starting at line 1570, that define the machine code routine?
The linked ANALOG page (http://www.cyberroach.com/analog/an10/basic.htm) explains the code, line number by line
number, it does not list the code itself.
Never mind, I have found a scan of the original ANALOG article:
https://archive.org/details/analog-computing-magazine-10/page/n75
This is fantastic, Mikey. Exactly what I was looking for. Thank you! I just bought an Atari 800XL (used to be a Sinlair guy) and I’m going to code for fun. I need a SIO2SD first. 😦 — Greetings from Buenos Aires.