By Mikey Walters / April 10, 2017
 This is the fifth in a series of articles about programming in Atari BASIC. The previous installments are here. Space Assault source code and references can be found here. BAS files for use with Atari emulators of the original program and enhanced program can be found here.
180 PRINT “Loop the Main Loop”
In Lesson Four, we experienced a crash course in manipulating Atari computer memory, specifically to initialize and control Player/Missile Graphics, and we learned how to move our players (sprites of Space Assault’s enemy ships and crosshair) across the playfield. With those powerful techniques under our belt, this lesson is action-packed! Not only will we cover joystick control, but also how to fire the mighty Fission Gun Tower. To get started, let’s look at the heart of the game, often called the “main loop.”
In nearly all game programs, there’s a series of actions that must occur seemingly simultaneously. In Space Assault, the crosshair must be moved based on joystick movement, enemy ships must travel towards their intended target, explosions and sounds should occur accordingly, and so on. However, in the 8-bit home computer era, processors like the 6502 in Atari home computers were single-threaded, meaning they performed a single task, then another task, and so on. But if these game actions simply “take turns” very quickly inside a loop, they appear to happen at once. Let’s examine the structure of Space Assault’s main loop, keeping in mind that some concepts and statements will be explained later in this lesson.
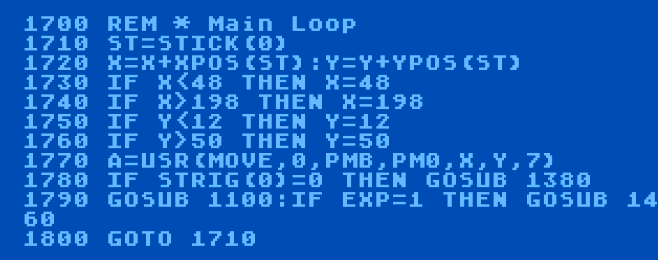 First, we handle the “human” turn by reading the joystick and determining the next horizontal and vertical coordinates for the crosshair (lines 1710-1760). We’ll look at this joystick code in more detail shortly. Next, we use the machine language Player/Missile Graphics movement routine discussed in Lesson Four to position the crosshair (Player 0) in the correct location (line 1770). Then we check if the joystick trigger has been pressed and fire the Fission Gun Tower if appropriate (line 1780). Finally, the enemy gets a turn, along with a check to see if an enemy explosion is in progress (line 1790). Then it all starts over again by jumping back to the start of the main loop (line 1800). This sequence of events will occur over and over again until the game is over, which means all of our bases have been destroyed.
In most modern programming, the concept of a “main loop” has been lost, since so many tasks are automatically handled by sophisticated operating systems and programming frameworks. Even early programmers of the Apple Macintosh in 1984 didn’t have to write code to move the mouse pointer in their applications, since the operating system was in charge of this task. Most programming today is event-driven, meaning the programmer only writes code to handle events (such as the user clicking a button, or a web service sending a message), while the foundation that generates these events and weaves them together is out of the programmer’s domain. In addition, today’s hardware with multiple processors truly can perform tasks simultaneously, so a programmer could write a thread to handle crosshair movement that operated independently of a thread handling enemy ship movement, for example.
190 PRINT “Taking Direction”
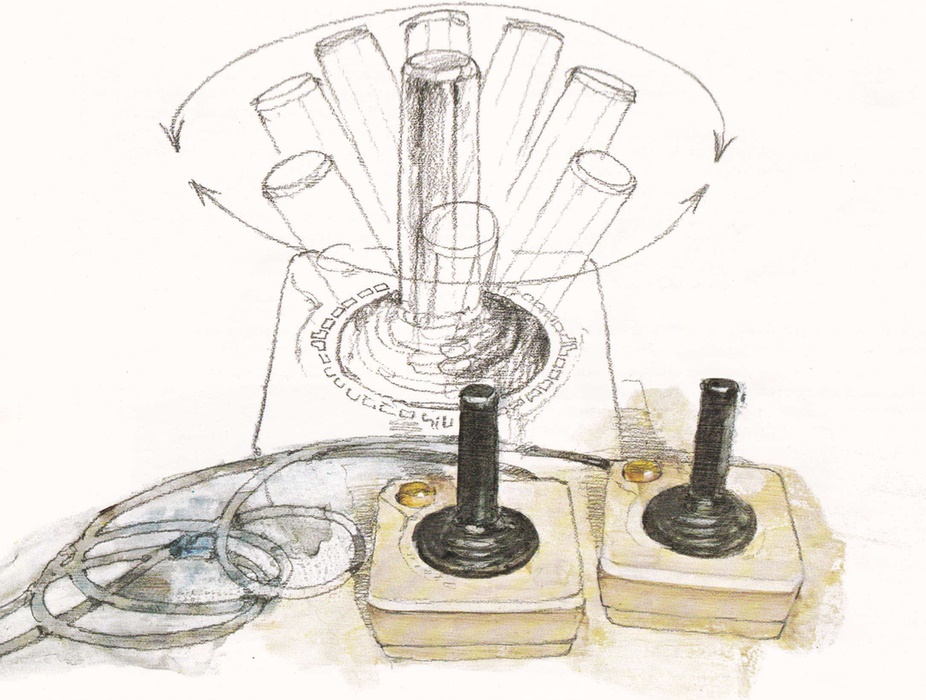
Since the Atari joystick was so well known due to the success of the Atari 2600 (VCS), the designers of Atari BASIC made certain it was easy for programmers to use on Atari home computers. The STICK statement allows us to read which direction the joystick is pressed, and the STRIG statement tells us if the joystick trigger is pressed. Both of these statements are deciphered using a single number from 0 to 3 corresponding to the four joystick ports, so STICK(0) will return the direction of the joystick in the first port. The values returned by STICK are somewhat unusual, but can be easily deciphered using the diagram below.
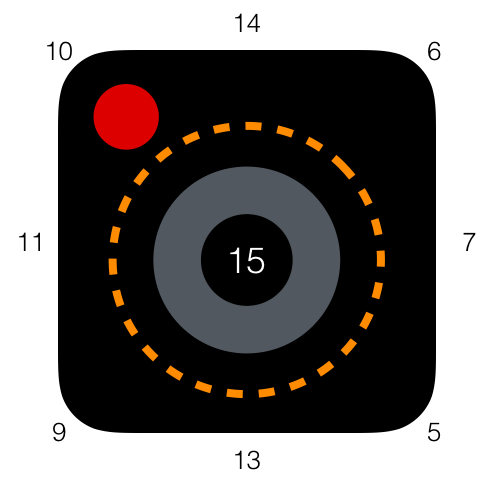 For example, if STICK(0) returns 7, we know the joystick has been pressed right. In Space Assault, we keep track of the position of the crosshair using two variables: X for the horizontal position and Y for the vertical position. If the joystick is pressed right or left, we need to make X larger or smaller, and the same is true for up and down and Y. For diagonal movement, we increment or decrement both X and Y accordingly. This could be done easily with eight distinct IF-THEN statements, such as IF STICK(0)=7 THEN X=X+1. But remember, these eight statements will be executed each time through the main loop, potentially making the game slower (once again, thanks to Atari BASIC being an interpreted language). Let’s look at a technique using arrays to make our joystick code smaller and more efficient.
 During Space Assault’s initialization, two arrays called XPOS and YPOS are filled with 15 numbers each. If you count the position of the non-zero numbers in the array, you’ll see that XPOS(7) is 4 and XPOS(11) is -4, for example. With these two arrays, our main loop joystick code can be reduced to simply adding the array value at the index corresponding to STICK for both X and Y. Remember that adding a negative number is the same as subtraction.
 You might be wondering why X and Y are changed by 4 rather than 1, and the reason is that it makes the game appear faster. Moving the crosshair by one pixel at a time seemed to be slow, and moving by four pixels seemed to provide a good balance between speed and the “jumpiness” that would occur if the increment was too large. This is another good example of a programming compromise, making Space Assault performance seem better while sacrificing some animation smoothness.
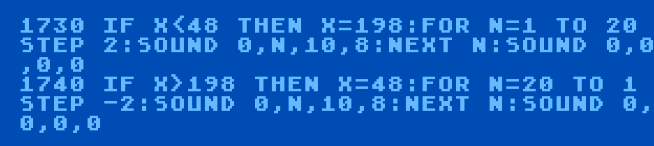
Unfortunately, after cleverly avoiding eight IF-THEN statements with the joystick array technique, we next use four IF-THEN statements to keep our crosshair bounded to the playfield so it can’t be moved offscreen (lines 1730-1760 above). I mentioned in Lesson Four that a player’s onscreen horizontal position was roughly from 48 through 198, so X cannot be larger or less than these values, meaning the crosshair is constrained to the same horizontal position. The same goes for Y with a minimum vertical position of 12, although we keep the maximum position at 50, which forces the crosshair to remain in the upper half of the playfield where the enemy ships move. I’m certain these coordinate bounds could have been handled more efficiently, but the existing code was good enough for me as a teenager.
Interestingly, a reader letter was included in ANALOG Computing Issue 15 (two issues after Space Assault was published) describing how the reader made the game seem faster by increasing the speed of movement even more than I did. He did this by doubling the values of the XPOS as YPOS arrays, so X and Y are changed by 8 pixels with each movement. This is way too jumpy for my taste, but I’m glad the reader was able to customize the game to his liking. He also cleverly made the alien ships move faster as the game progresses, essentially adding difficulty levels, something I didn’t bother to do at the time. This kind of user modification was a truly wonderful aspect of programming in the early 1980s, because everyone was learning together via resources like source code listings in magazines.
200 PRINT “Drawing the Blast”
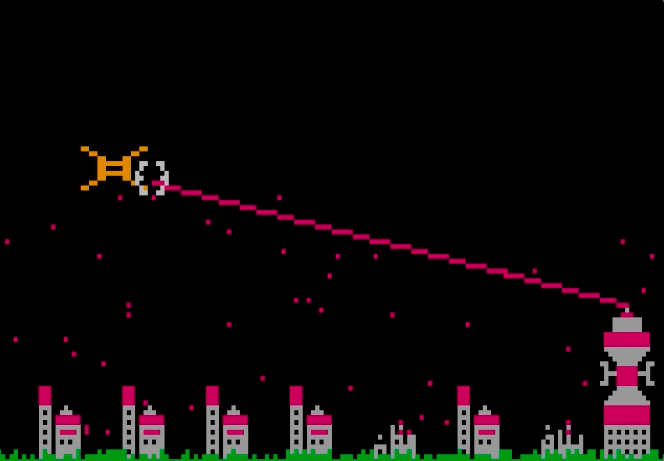
As we saw above, every time our main loop is executed, we use the STRIG command to check the joystick trigger. We need to execute code to fire the Fission Gun Tower if the trigger has been pressed, but it’s best to keep the lines of code associated with this out of the main loop so the loop will run faster. Since firing the gun is something that will be done many times during game play, this is a good time to use a subroutine. Atari BASIC supports using subroutines with two statements. The GOSUB statement will immediately jump to a specified line of code, while remembering where the program was executing before the jump. This is similar to the GOTO statement, except GOTO doesn’t keep track before jumping. The RETURN statement will conveniently jump back to where the last GOSUB was executed, making it easy to call a section of code and pick up where we left off when our subroutine is finished.
When the joystick trigger is pressed, our main loop jumps to the “Shoot Tower Gun” subroutine (line 1780 above).
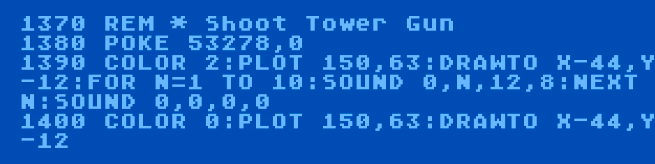 Our main task in firing the gun is drawing the beam from the tip of the tower to the current position of the crosshair controlled by the joystick. First we select our purple color and PLOT the tip of the gun, and then DRAWTO the crosshair using the X and Y coordinate variables that represent the position of the crosshair (line 1390). We have to do a little conversion between Player/Missile Graphics coordinates and playfield coordinates, since the number of pixels is slightly different between the two. This conversion also takes into account the shape of the crosshair player, so the line we draw will end roughly in the center of the crosshair. After drawing the beam, we create a short sound effect using a FOR loop and the SOUND statement. We’ll cover the details of Atari BASIC sound in a future lesson.
 The reason we can easily use our X and Y variables in this subroutine is because all variables in Atari BASIC are global, meaning they can be referenced anywhere in our program. Since the creation of BASIC, programming languages have increasingly emphasized the concept of variable scope, meaning a block of code should only reference variables declared in the same block or variables that have been passed to the block from the calling code. BASIC’s global variables are an easy concept to learn for a beginning programmer, but would almost never be used in modern programming languages today.
Since we now have a purple line drawn across the playfield, the next step is to erase it so our sky won’t be permanently filled with beams. All we need to do is switch to the background color and PLOT and DRAWTO the identical line, effectively erasing the beam (line 1400). At this point we’ve blasted our Fission Gun Tower, but how do we know if we’ve hit an enemy ship? We can use another powerful feature of Player/Missile Graphics to find out.
210 PRINT “Detecting Collisions”
In almost any computer game, it’s important to know when objects on screen are “touching.” In Pong, for example, we need to know when the ball has touched a paddle. For Space Assault, we need to know that the beam we’ve just drawn has touched, or collided, with an enemy ship. This is called collision detection, and Player/Missile Graphics handles this automatically via several registers waiting for us to PEEK. Each player has dedicated registers that indicate if the player has touched another player, or if the player has touched something drawn on the playfield. The convenience to the programmer of automatic collision detection cannot be overstated, and it’s another huge advantage of using sprites.
Notice that before we drew our beam, we POKED 0 into address 53278 (line 1380 above). This clears all collision registers so they are reset and ready to be checked at the appropriate time. After drawing the beam, we can PEEK into the appropriate registers depending on which kind of enemy ship is traveling across the screen, indicated by the variable SHIP.
 If the Combat Saucer (SHIP=1) is attacking, we need to look at the collision registers for Player 1 (line 1410). PEEKing address 53253 tells us if Player 1 has touched something drawn on the playfield, which would be the line we drew to represent the beam. PEEKing address 53261 tells us if Player 1 has touched another player, which would be our crosshair. The reason we check both of these registers is to verify a “direct hit,” meaning the crosshair was positioned on the enemy ship when the gun was fired. If we didn’t check the player-to-player collision register, then hits could be scored by firing “past” the enemy ship, since the beam would be drawn through the player.
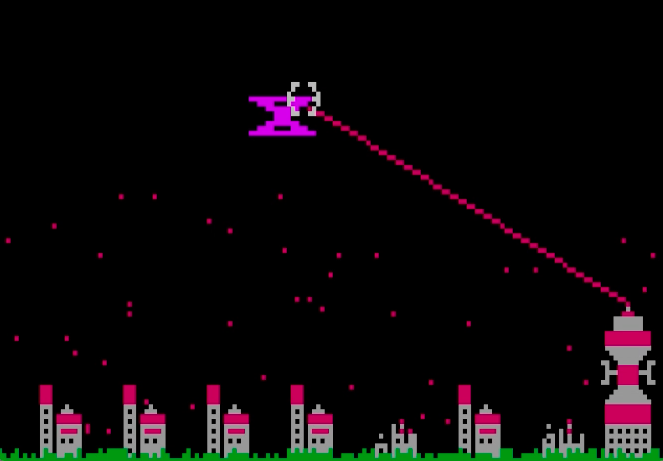 If both of these registers have a non-zero value, the enemy ship is hit! After setting some variables that we’ll discuss in a moment and increasing the score by the value appropriate to the type of destroyed ship, we POKE the appropriate horizontal position register (53249 for Player 1) with 0 to instantly move the enemy ship offscreen, causing it to disappear. And finally, we use GOSUB to jump to a subroutine that selects a new enemy ship to terrorize the planet. All of these steps are duplicated for the three kinds of enemy ships, and the final RETURN statement jumps back into our main loop.
220 PRINT “Explosion Multitasking”
It may be obvious by examining the linear nature of Space Assault’s code, but it’s important to realize that Atari BASIC executes synchronously. As we discussed earlier, only one task happens at a time, and the concept of asynchronous processing that’s so common today was simply not available to amateur programmers in the early ’80s. However, the appearance of more than one task happening at once was possible with clever programming techniques. Space Assault attempts this in a somewhat primitive way so the main loop can continue to cycle during an explosion effect after an enemy ship is hit. This allows the game player to keep moving the crosshair with the joystick while the explosion is occurring.
In our “Shoot Tower Gun” subroutine, after a successful hit we set EXP to 1 to indicate an explosion is in progress, and set SD (short for “sound”) to 40 (line 1410 above). Every time we proceed through our main loop, we check EXP to see if we should call the “Explosion Routine” (line 1790 above).
 This short and simple subroutine increases SD for use in a SOUND statement. If SD is greater than 100, the explosion is “over,” so we stop the explosion sound and set EXP to 0 (line 1460), which will cause our main loop to quit calling the explosion subroutine. In other words, EXP is a flag variable with two states (explosion in progress or explosion not in progress). Using flag variables to control the flow of execution is a quite common programming technique.
Next we use SETCOLOR to change the playfield background color to white and quickly back to black, causing a strobe effect (line 1470). Finally, we use SD as a parameter of the SOUND statement, which makes the explosion noise progressively lower in tone as the subroutine is continually called (line 1480). And of course, the RETURN statement jumps back to our main loop where we continue reading the joystick, moving the crosshair, and keeping the game play flowing.
230 PRINT “Wrapping the Crosshair”
For this lesson’s variations on the original code, I decided to add horizontal wrapping when the crosshair is moved to the extreme left or right of the screen. By changing two lines of our maximum bounds check code in the main loop, it’s quite simple to swap the X coordinates to the opposite extreme when the limit is reached, instantly popping the crosshair to the other side of the playfield. I’ve also added a small sound effect when this happens, which is a fast rising tone (“whoop”) when wrapping to the right side, or a fast falling tone when wrapping to the left.
 Vertical wrapping is also possible, but doesn’t really make sense for Space Assault, since the enemy ships always stay in a somewhat narrow band at the top of the screen. With the addition of crosshair wrapping, another defensive technique is available to protect the planet from those evil Clovis Aliens.
Next time, the aliens get a chance to strike. We’ll learn the secrets behind their movement, and, unfortunately for the planet Kala, how to destroy a Vegetation Processing Plant!
![]() Mikey Walters lives in Austin, Texas, and has an entire room devoted to toys, including Mego figures, Japanese kaiju, and over 1,000 PEZ dispensers. He spends his time thinking about how great it is to be a geek who grew up in the 1970s.
Mikey Walters lives in Austin, Texas, and has an entire room devoted to toys, including Mego figures, Japanese kaiju, and over 1,000 PEZ dispensers. He spends his time thinking about how great it is to be a geek who grew up in the 1970s.


Pingback: Adventures in Atari BASIC: Lesson Six – Enemies and Earthquakes